Dry Set Paver Patio

Dry Set Paver Patio

Dry Set Paver Patio

Dry Set Paver Patio

Is extremely advisable to use dry set, it’s simple to lay and change if  needed and is the best choice for northern climate.

Steps:

Excavate if wanted

Compact (Soil has to have proper moisture)

Level, compact and repeat

Add 6” to eight” crushed limestone (sharp edges help a comfortable match) permits for good drainage.

Compact layers

Add the limestone in 2 -Three layers

Level compact and repeat

Top with ½” sand

Then lay pavers

Clearly outline borders 6×12 Travertine Pavers

After pavers are in place Polymeric sand might be swept between cracks, grout, or they are often left alone

Dry Set Paver Patio

Edging

It’s really useful to put in landscape edging on the edge of the pavers this may hold them from shifting out of place (Top of the edging have to be Level with the travertine paver edge)

An alternate is pouring concrete along the outside edge after tiles are set (top of the edging must be level with the travertine paver edge)

Finishes

Your outdoor travertine paver finish options are:

Tumbled finish, has textured, porous finish that’s skid-resistant.

Honed is a smoother finish than tumbled  however has needed traction when moist.

Polished finish is smooth and should only be installed in covered indoor areas porch patio etc…

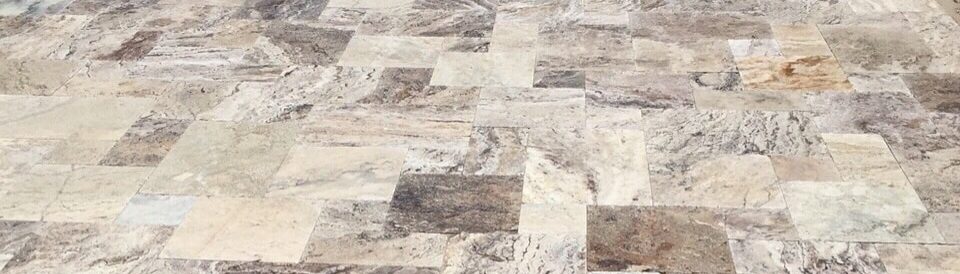
TRAVERTINE PAVERS INSTALLATION Patterns

The pattern is up to you as there are several size options:

6×12, 8×8, 8×16, 12×12, 12×24, 16×16, 16×24, & 24×24

French pattern/mini-French pattern

Pattern repeats after the first sq. ends (tiles are 16″ by 24″, 16″ by 16″, 16″ by 8″ & 8″by 8″ pavers and covers 16 sq. ft. space. You should place tiles close together and you must fill the joints with sand).

When pavers are set, check for level, go over the area with a plate compactor once more.

Stone Tile Us ships to all places and quickly, check or flooring tile shipping policy. 

See our latest natural stone projects it may give you some project ideas.

For those who want extra details about our Natural Stone choice, give us a call immediately 855-344-8716.

Cleaning Grout

Cleaning Grout

Cleaning Grout

Cleaning Grout 

Grout discoloration is said to be removed up to 85%, 15% of  the stain left behind is from installation or just exposure over time.

After the grouting process is repeated several times you may consider the option of color sealing your grout as opposed to the tedious

process of constant cleaning.

Allow an alkaline cleaners to absorb into the floors a while it will brake up the dirt and grease. The recommended time is 20-30 min.

Use a grout brush to scrub your floors and be mindful of bumping into your walls, vacuum or mop and then rinse floors with warm water.

Use cotton clothes to dry and then you are ready to apply sealant.

Read More:

Cleaning Grout 

Wooden Look Tile Placement

Wooden Look Tile Placement

Wooden Look Tile Placement

Wooden Look Tile Placement 

Like hardwood flooring stone floors can be utilized all through the house.

Make sure to select a natural stone you find to be beautiful and can reside with.

It may be pricey to have it it removed and reinstalled in the future.

Our natural stone products are extraordinarily sturdy and last a very long time.

For best results make sure to maintain cleanness, add chair pads and prevent grime from building on the floors surface.

Wooden Look Tile Placement 

This will also prevent scratching, you can glaze or seal your floors for additional protection and longevity.

The sealant will especially be useful in areas of excessive traffic and entertainment.

Sealing  also add to the sanitation of the area that is tiled.

Natural stone, hardwood flooring needs to be put in by professionals accustomed working with these materials.

Stone Tile Us Natural Stone is a reliable supplier  for all of your marble, travertine and limestone needs.

We do actually carry stone that resembles hard wood flooring.


Limestone Constructing Supplies

Limestone Constructing Supplies

Limestone Constructing Supplies

AQA GCSE Core Science – Limestone and Constructing Supplies

Core Science Limestone Constructing Supplies

Limestone is a naturally occurring rock present in a quarry, it’s typically used for constructing supplies.
Glass, cement and concrete producers use chemically heated decomposed limestone

as a natural resource to begin  manufacturing of these materials.

Job creation and constructing supplies are some benefits of limestone quarries.

Disadvantages can be air pollution, noise and is visually unappealing.

Limestone Constructing Supplies

The video provides particular scientific breakdown and chemical composition of limestone.


Stone Tile Us does carry a selection of limestone for your constructing needs.

We ships nationally, verify our flooring tile shipping policy. 

Please go to our forum for tutorials and extra details about pure stone merchandise.

Contact us for extra details about our pure stone choice 855-344-8716.


Bathe Tile SetUp

Bathe Tile SetUp

Bathe Tile SetUp

Bathe Tile Setup

Mosaic tile set up for the bathe Half 6

Mosaic tiles will not be tough to put in, they arrive on mesh backed sheets.

You are putting in a number of them at a time and never individually,  sure they’re smaller than different tiles.

You will need to lay them out and take a look at your sample earlier than precise set up.

Evaluate tile layout in case you discover there are areas which might be irregular and will not match full dimension tiles.

Measure and cut any tiles that are needed to fit in odd irregular or shaped areas.

After format is deliberate then tiles will be secured in place.

Make certain they’re flattened so no air pockets exist, they have to be even and flush.

Grout a small space at a time so the grout doesn’t dry on the tiles earlier than they’re securely floated within the cracks.

Cleansing little by little will forestall drying of grout and tough scraping to scrape off.

Mosaic Tile Bathe Ground Set up

Please go to us on your mosaic natural stone, we ship all over the place in the USA quick.

Additionally see our boards on Pinterest for more inspiration.

Floor Installation Shower 

Floor Installation Shower 

Floor Installation Shower

Floor Installation Shower 


Totally  refresh your bathroom with a Floor Installation Shower area!

In addition to floors why not add a new vanity for an inexpensive professional finish!

Modern Double bathroom vanities Modern Bathroom Vanities in Canada.

Choose from a contemporary, wall-mount,Floating, Classic, Antique or a modern free standing Bathroom Vanity.

You have a variety of double bathroom vanities to meet your needs.

A wide variety of bathroom vanities are available in these Canadian locations:

Home Depot, Lowes, Costco, Ikea, overstock.com, Wayfair.com, Vanities Miami, and allmodern.com.

Great modern bathroom vanities and sink cabinets bathroom are offered at Atlantic Vanity Source!

Visit our Facebook page for updates. Atlantic Vanity Source can supply your

modern bathroom vanity needs with ample storage for all your everyday needs.

We carry a wide variety of mosaic tiles which are great for tiling bathroom floors, walls and so much more.

Stone Tile Us ships everywhere and fast, check or flooring tile shipping policy. 

Check our latest natural stone projects to help you visualize yours.

If you need more information about our natural stone selection, give us a call today 855-344-8716.

Stone Countertops

Stone Countertops

Stone Countertops

Stone Countertops

Stone Countertops

Lime stone is another great counter top option.

It is a type of fossil stone and often has nicely preserved fossils.

Fossil Stone is a dense limestone filled with various organic matter.

It is a sedimentary rock with natural variation and mottling.

Fossil stone has the contrast of this matter and the limestone (main stone).

The limestone background makes for striking and beautiful contrast.

Shells, plants, animals and other organic matter that don’t decay, harden with minerals over time and become fossilized.

This process forms fossil stone which is the preserved remains of animals, plants and organisms from the past.

It is said that customers consider limestone pale however, it is versatile due to its neutral color.

Here at Stone Tile US we carry limestone in: Limra, Myra Beige, and Wooden Grey.

Stone Countertops

Limra Limestone Tiles is one of the most preferred and used tiles for inside design.

Limra is one of the whitest natural stones on the market. It is uniform in grain and color.

The surface is very consistent, soft and warm to the touch. It has a thin grain and the background a very uniform. Limra Limestone Tiles can be finished in a variety of ways the most popular is polished and honed.

It is preferred for masonry, stone work, and outdoor walls.

The variation in color of the Limra tile consists of subtle brown dots on a light cream background.

It’s a soft material and the sizes we offer in Limra Polished Limestone Tile is 24×24.

Wooden Gray Polished Limestone Tiles is a grayish marble with vein cuts that give the appearance of a wood finish.

There is a white background with gorgeous gray and black, in very subtle tones, making it very versatile.

We offer Wooden Gray Polished Limestone Tiles in 18×36.

Anatolian Fiorito Deep Brushed Limestone Tiles have a beige/cream color.

The surface has a mostly uniform surface with darker dashes and specs of caramel.

Anatolian Fiorito Deep Brushed Limestone Tiles are available to you from our website in two sizes 12×24, 18×36.

Myra Beige Tumbled French Pattern Limestone Pavers.

Myra Beige Tumbled French Pattern Limestone Pavers for pool deck, patios and more!

6 PIECES OF SET (8X8, 8X16, 16X16, 16X24 1.25)

Stone Countertops

There are other limestones on the market in various colors.

Limra Limestone has a super small seed like texture.

It is very porous and a sealer is to be applied before and after installation.

Champagne White Limra Limestone falls in the shade family of Cream, Ivory, and White.

Stone Tile Us ships everywhere and fast, check our flooring tile shipping policy. 

Check our latest natural stone projects to help you visualize yours.

If you need more information about our natural stone selection, give us a call today 855-344-8716

Floor Tile Installation

Floor Tile Installation

Floor Tile Installation

Floor Tile Installation 

Tile Installation 

Your 1st step in marble travertine Installation should be to seek the advice from licensed, insured professional.

The company you choose should have marble and travertine (natural stone) installation expertise

Always remember don’t to check their customer ratings it will guide you.

If possible a reference/referral from a friend or neighbor with a good experience can be so priceless.

Regardless of how you approach the project do your research.

The same applies if you want to do your own installation, below are general steps further research should be done before beginning the project and more detailed information needs be obtained before laying natural stone tiles.

Floor Tile Installation 

1. Always protect your lungs, hands and eyes as you install your marble tiles.
2. Use gloves, face mask and protective goggles.
3. Remove all tiles that are already installed.
4. Clean and dry floor before you start installation.
5. Use the longest level you can find and level the floor.
6. Sand bumps and fill holes with thin-set cement make sure it dries.
7. Lay a plywood if the floor is still not even.
8. Check for change in height, no more than ¼ inch or 6 mm with distance of 10 feet or 3 mm.
9. Use your finger nails to check for cracks or irregularities on the surface of the tile, If there is a crack don’t use it will break during the installation.

Floor Tile Installation 

10. Take measurements, layout on paper, decide on the pattern of layout and draw the pattern to scale.
11. Try not to cut tiles if possible leave full-sized, keep strips 2 inches (5 cm) wide and long.
12. Measure the center of the room and light mark with a pencil.
13. Do a dry-run by placing your tiles within the grid before actually laying them.
14. Add a layer of thin-set adhesive on the floor with a notched trowel.
15. Lay stone tile us marble tiles firmly in the thin-set adhesive.
16. Use spacers to position the marble tiles.
17. Use level to check the tiles.
18. Take measurements of any partial tiles needed
19. To fit in the edges along the walls or odd spaces, use a wet saw to cut the tiles and prevent cracking.
20. Leave tiles 24-48 hours to allow for complete drying completely.

Floor Tile Installation 

21. Seal the marble.
22. Use grout, or mortar, to fill in spaces between the tiles.
23. Use a moist sponge to dampen the spaces between the tiles.
24. Then fill spaces with cement.
25. Push it into the spaces to create a tight fight.
26. Clean any grout on top of the tiles as you go while still damp.
27. Squeegee is use to spread out the grout.
28. Wipe down the tile surface with a clean sponge
29. Let the grout to dry.
30. Then Seal the grout.

Stone Tile Us ships everywhere and fast, check or flooring tile shipping policy. 

Check our latest natural stone projects to help you visualize yours.

If you need more information about our natural stone selection, give us a call today 855-344-8716.

See more: http://thd.co/1usoQ9y Watch our How to Install Ceramic and Porcelain Floor Tile videos and learn the steps needed for a successful installation. You’ll …

source

Install Kitchen Tile Back Splash

Install Kitchen Tile Back Splash

Install Kitchen Tile Back Splash

Home Depot- Install Kitchen Tile Back Splash

Install Kitchen Tile Back Splash

Proper planning makes for smooth process to Install Kitchen Tile Back Splash.

Make a list, have everything assembled before getting started.

Get at least 10% to 20% extra for breakage and trim.

BASIC Back Splash Tile Materials:

Tape Measure

Chalk (for lines)

Thinset or tile adhesive

(Buy the correct amount of thinset/adhesive as it is to hold the tile on the wall)

Notched trowel

Use two thirds of the thickness of the tile being set.

(The trowel is for spreading the adhesive “combs” it onto the surface)

Level

Insures that installation is done on an even surface, if the floor is not even sand or remove excess material.

Tile Spacers

(Are to insure the lines between the tiles are properly spaced, usually 1/16 inch to 1/2 inch for kitchen walls.

The average being 1/8 inch grout line which is pleasing to the eye.)

The wet tile saw is circular and cuts with water lubrication.

You can make straight cut with the tile saw only, not nippers.

It is suggested to rent a wet saw, if you don’t know someone that will share theirs with you.

If you plan on doing more projects buy good wet saw.

(Wet Saw has a range of prices but will be a couple hundred dollars).

One hundred and fifty dollars is the average cost.

Cutters

(For wall tile installation these maybe all you need, however you should always have additional nippers)

Practice cut on cheap tiles first with nippers and/or tile saw

(Snap/Rail cutter is usually about $20)

Grout Float

You’ll need a rubber grout float to apply the grout after the tile is set and a grout is dry.

Non-sanded grouts are used for narrow areas

There will be many colors to choose from. Stores will have a sample palate that can be matched against the tiles to ensure correct color.  Choice of: Non-sanded grouts are used for narrow areas up to 1/8″, Sanded grouts are used for areas from 1/8″ to 3/4″ and more.

Sponge will wipe off the excess grout from the tile.

Remember to get Cleaning Cloths.

Add Goggles to your list.

Use a  Pencil to write everything down and you will need it again.

A Hammer needs to be on your list

Rubber Gloves will protect your hands

Knee Pads keep your knees from bruising.

Mosaics Tile sheets are curved on all sides, giving them the ability to fit together with a seamless finish.
It is the art of creating an assemblage of small pieces of natural stone creating a complete pattern for use on floor,
walls, back splashes, kitchen, and bathroom. It is a technique used to create interior or artistic design.

Install Kitchen Tile Back Splash

Lay tiles before using adhesive and then tiles can be cut with a knife on grout lines.

Take measurements-measure to center of the room.
Use a pencil to mark the corners then remove tiles. Begin at each corner and mark chalk lines to make a box for the field tile.
Mix thinset to a thick creamy consistency, allow it sit for 10 minutes. Then use a notch towel 1/4 x 1/4  and then set tiles.
Inlay tiles with a margin trowel and lay them in place.
To get wall tiles to size cut with a wet saw,you can use a tile nipper for small tight areas.

Stone Tile Us ships everywhere and fast, check our flooring tile shipping policy. 

Check our latest natural stone projects to help you visualize yours.

Need more information about our natural stone selection? give us a call today 855-344-8716.

Find more information and the materials needed for this project here: http://thd.co/XXl0uG Find backsplash options from The Home Depot here: …

source

Pool Coping Stair Treads

Pool Coping Stair Treads

Pool Coping Stair Treads

Pool Coping Stair Treads

Are one and the same with measurement of 1.25″ or 2″ thick.
Stair Treads are usually sold as pool coping, one side is bullnosed for a rounded edge and that makes it perfect for
pool edges, or any other project where such a finish is needed.
Stair treads and pool coping in natural stone comes with the convenience of high quality and easy installation.
They have a tumbled surface, and this makes them ideal for any area where a safe smooth edge is needed.
Square corners may not always be appropriate or safe especially in the pool area.
Rounded sides, act as an exposed edge and protector.
We offer pool copings/stair treads in marble and travertine sizes:
4×9, 6×12, 12×12, 12×24, 16×24

Thank you for visiting Stone Tile Us Pool coping selection today!

Stone Tile Us ships everywhere and fast, check our flooring tile shipping policy. 

Check our latest natural stone projects to help you visualize yours.

If you need more information about our natural stone selection, give us a call today 855-344-8716